Distributed Training
hopwise provides the same functionality as RecBole, but with a more user-friendly interface.
Now we support distributed training and evaluation. Here is a distributed training example for using hopwise. We will show you how to train and test BPR model on the ml-100k dataset in the distributed environment.
Prepare your environment
Before distributed training, firstly you need to prepare your computing environment. Here we first introduce some basic concepts to describe the environment.
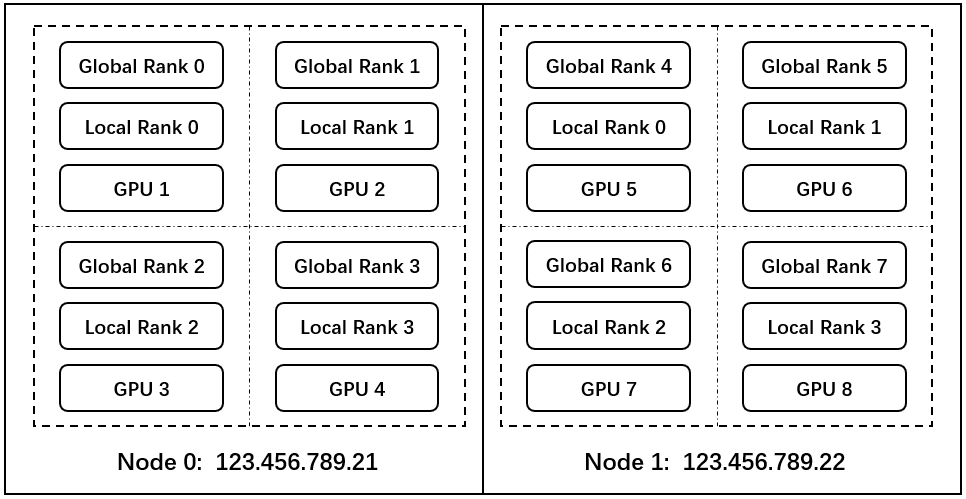
rank: It is used to represent the number / sequence number of processes (in some structural diagrams, rank refers to soft nodes, and rank can be regarded as a computing unit). Each process corresponds to a rank process, and the whole distribution is completed by many ranks.node: The physical node can be a machine or a container, and there can be multiple GPUs inside the node.local rank: It refers to the relative sequence number of the process on a node and is independent between nodes.world size: The number of ranks in the global (the whole distributed task).
Suppose you have two devices and each device has four GPUs to train your model, the environment is shown as following:
Quick-start From API
1. Prepare your data
Note in distributed training, the config and dataset of each process should be the same. It is recommended that you create a configuration file shared by different processes. In above example, you can create a yaml file called test.yaml and write the following settings:
gpu_id: '0,1,2,3'
# dataset config
USER_ID_FIELD: user_id
ITEM_ID_FIELD: item_id
load_col:
    inter: [user_id, item_id]
For more details of data config, please refer to Data settings.
2. Choose a model:
Here we choose BPR model to train and test.
Then, you need to set the parameter for BPR model. You can check the BPR and add the model settings into the test.yaml, like:
# model config
embedding_size: 64
If you want to run different models, you can read Running Different Models for more information.
3. Set training and evaluation config:
In hopwise, we support multiple training and evaluation methods. You can choose how to train and test model by simply setting the config.
Here we want to train and test the BPR model in training-validation-test method (optimize model parameters on the training set, do parameter selection according to the results on the validation set, and finally report the results on the test set) and evaluate the model performance by full ranking with all item candidates, so we can add the following settings into the test.yaml.
# Training and evaluation config
epochs: 500
train_batch_size: 4096
eval_batch_size: 4096
train_neg_sample_args:
    distribution: uniform
    sample_num: 1
    alpha: 1.0
    dynamic: False
    candidate_num: 0
eval_args:
    group_by: user
    order: RO
    split: {'RS': [0.8,0.1,0.1]}
    mode: full
metrics: ['Recall', 'MRR', 'NDCG', 'Hit', 'Precision']
topk: 10
valid_metric: MRR@10
metric_decimal_place: 4
For more details of training and evaluation config, please refer to Training Settings and Evaluation Settings.
4. Run the model and collect the result
Now you have finished all the preparations, it’s time to run the model! In distributed training, you should specify the following parameters on each node:
ip: IP address of the master node (i.e. node of the process with rank of 0).port: The port number of the master node.world_size: The number of ranks in the global (the whole distributed task).nproc: The number of processes on current node.group_offset: The offset of the global rank of current node (i.e. the lowest global rank of current node).
In above example, you can create a new python file (e.g., run_a.py) on node A, and write the following code:
from hopwise.quick_start import run_hopwises
import torch.multiprocessing as mp
args = dict(
    model = 'BPR',
    dataset = 'ml-100k',
    config_file_list = ['test.yaml'],
    ip = '123.456.789.21',
    port = '5678',
    world_size = 8,
    nproc = 4,
    group_offset = 0
)

# Optional, only needed if you want to get the result of each process.
queue = mp.get_context('spawn').SimpleQueue()

config_dict = config_dict or {}
config_dict.update({
    "world_size": args.world_size,
    "ip": args.ip,
    "port": args.port,
    "nproc": args.nproc,
    "offset": args.group_offset,
})
kwargs = {
    "config_dict": config_dict,
    "queue": queue, # Optional
}

mp.spawn(
    run_hopwises,
    args=(args.model, args.dataset, args.config_file_list, kwargs),
    nprocs=nproc,
    join=True,
)

# Normally, there should be only one item in the queue
res = None if queue.empty() else queue.get()
Then run the following command:
python run_a.py
Similarly, you can create a new python file (e.g., run_b.py) on node B, and write the following code:
from hopwise.quick_start import run_hopwises
import torch.multiprocessing as mp
args = dict(
    model = 'BPR',
    dataset = 'ml-100k',
    config_file_list = ['test.yaml'],
    ip = '123.456.789.22',
    port = '5678',
    world_size = 8,
    nproc = 4,
    group_offset = 4
)

# Optional, only needed if you want to get the result of each process.
queue = mp.get_context('spawn').SimpleQueue()

config_dict = config_dict or {}
config_dict.update({
    "world_size": args.world_size,
    "ip": args.ip,
    "port": args.port,
    "nproc": args.nproc,
    "offset": args.group_offset,
})
kwargs = {
    "config_dict": config_dict,
    "queue": queue, # Optional
}

mp.spawn(
    run_hopwises,
    args=(args.model, args.dataset, args.config_file_list, kwargs),
    nprocs=nproc,
    join=True,
)

# Normally, there should be only one item in the queue
res = None if queue.empty() else queue.get()
Then run the following command:
python run_b.py
Finally you will get the model’s performance on the test set and the model file will be saved under the /saved. Besides, RecBole allows tracking and visualizing train loss and valid score with TensorBoard, please read the Use Tensorboard for more details.
The above is the whole process of running a model in RecBole, and you can read other docs for depth usage.
Quick-start From CLI
Besides using API, you can also directly run the source code of hopwise. The whole process is similar to Quick-start From API. You can create a yaml file called test.yaml and set all the config as following:
# dataset config
USER_ID_FIELD: user_id
ITEM_ID_FIELD: item_id
load_col:
    inter: [user_id, item_id]

# model config
embedding_size: 64

# Training and evaluation config
epochs: 500
train_batch_size: 4096
eval_batch_size: 4096
train_neg_sample_args:
    distribution: uniform
    sample_num: 1
    alpha: 1.0
    dynamic: False
    candidate_num: 0
eval_args:
    group_by: user
    order: RO
    split: {'RS': [0.8,0.1,0.1]}
    mode: full
metrics: ['Recall', 'MRR', 'NDCG', 'Hit', 'Precision']
topk: 10
valid_metric: MRR@10
metric_decimal_place: 4
1. Single node multi gpus
If you train your model on one node with multi gpus, you only need to specify the number of processes on the command line.
In above example, you should run the following command:
python hopwise --model=BPR --dataset=ml-100k --config_files=test.yaml --nproc=4
And you will get the output of running the BPR model on the ml-100k dataset.
2. Multi nodes multi gpus
If you train your model on multi nodes with multi gpus, you need to specify the same parameters as Quick-start From API.
In above example, you should run the following command on node A:
python hopwise --model=BPR --dataset=ml-100k --config_files=test.yaml --ip='183.174.228.81' --port='5678' --nproc=4 --world_size=8 --group_offset=0
And run the following command on node B:
python hopwise --model=BPR --dataset=ml-100k --config_files=test.yaml --ip='183.174.228.81' --port='5678' --nproc=4 --world_size=8 --group_offset=4